Monday, December 27, 2010

Vellum Bridal Shower Invitations

A view of the first version of this bridal shower invitation -- I changed the heart later (see pictures below). 
Another view of the first version of this bridal invitation -- I changed the heart in the middle (see below)
Close up of the bottom embossed area of the vellum paper (with the updated heart)


Close up of the embossed areas of the vellum paper and the pearls and updated heart


Here is the second invitation I designed for my future niece's bridal shower.  Wasn't sure if my sister wanted a more "traditional" look or a vintage look (my previous post).  This invitation also uses the color purple as the base.  I then cut a piece of floral cardstock (mint, purple, pink colors) and used it as the focal point in the center of the card.  I then took a sheet of vellum paper and ran it thru my Big Shot to emboss it with the tiny birds, vines, etc.  I cut that down to fit over the printed paper to give it a more muted look.  I colored the embossed areas of the vellum with chalks to soften the appearance.  I attached the vellum to the top of the printed card stock using special vellum tape.  A notch was punched in the left side of the papers and a sheer purple ribbon was laced thru and knotted.  I then took a piece of vellum and ran it thru the Big Shot using my embossed heart die cut, punched a heart from the purple card stock, layered the two and placed in the middle of the card front.  I also added six tiny pearls to the embossed vellum paper to make it more elegant.  I think it is the perfect finish touch!
It took me some time to get everything the way I wanted it to be, removing parts and pieces, replacing them with other embellishments until I finally liked the end result!

Vintage Bridal Shower Invitations

Vintage Bridal Shower Invitation

Close up of vintage lace and embossed button

Close up of embossed heart lock, torn edges, and verse underheath

Close up of embossed key and scalloped edge border

I have been asked to design invitations for my future niece's bridal shower.  I wasn't sure what type of "theme" my sister would like, so I started out using the vintage look 9my favorite!).  The wedding theme color is purple, so I wanted to use that somewhat in the invitation without being overpowering.

I ran heavy gold metallic card stock thru my Big Shot machine to cut out and emboss the "trinkets"; I then used brown ink to distress them and give them a "tarnished" look.  Found a piece of antique lace to give some texture to the card.  I also stamped the verse "love" and placed it underneath the top left corner of the vintage papers that I had pieced together.  I then ripped the top left edge of the vintage papers to expose the verse underneath, curling the paper and distressing all edges to give it a more vintage appearance.  I also used a scalloped border punch to bring attention to the right border, also distressing this area.  I was happy with the results!  Time consuming, of course, but well worth it!!!

Tuesday, December 21, 2010

Christmas Card Luncheon Workshop

Blue snow globe with embossed snowflake background paper
 I held four Christmas card luncheon workshops during the first few weeks of December.  There were about twelve ladies that participated in total, most coming on multiple days.  What a great way to spend our lunch hour, playing with glue, paper,  and glitter! 
Feather tree embellished with mini buttons; background is embossed and sanded  Coordination paper

Embossed background using mat board; fabric poinsettia flower buttons

Watercolor snowman with crushed glass glitter for snow effect

Watercolor vintage tree embellished with crushed glass glitter

Show globe with snowflake embossed white background

Christmas Card Workshop Class

Vintage Bells
 Here are the cards we made at an evening Christmas Workshop one evening after work.  We had nine ladies participating, lots of great snacks and loads of fun!


Gold waffle paper with embossed background

Corner photo punches define stamped image

Stamped image on top of printed paper

Love the gold chunky glitter effect

Ribbon makes this look like a vintage package

Love the gold chunky glitter around the stamped image edges

Poinsettias stamped, colored, and layered on top of each other...with gold chunky glitter; lots of layers!Decision Points

Thursday, November 11, 2010

Thanksgiving card class

Paisley leaves Thanksgiving Card

Glitter leaves Thanksgiving card

Pumpkin embossed Thanksgiving card      


These are the three cards we will be making during our lunch Thanksgiving workshops this week and next.  We are using the new Sizzix falling leaves and fall background embossing folders -- they really make a nice, deep impression in the paper.  I also use the embossing folders to emboss the envelopes to make a unique look!  Love it!!!

Tuesday, October 12, 2010

Dracula/embossed spider web Halloween Card

I updated a previous Halloween card, using a yellow moon behind the character and added black waffle paper from Stampin'Up! behind the character, looking  as if it is a part of his cape.  I also removed the tag I had originally put on the card, cut out each individual word, and positioned it towards the bottom of the card.  I think I like this version better than the first one!!!

"H" is for Halloween Card

Used a Stampin'Up! set from last year to create this card.  I stamped the hat and spiders on white cardstock.  I stamped the pumpkin on a separate scrap of white cardstock, cut out by hand, and used a glue dot to attach to the front of the hat.  I punched two small holes along each side of the hat; ran some printed ribbon across the front of the hat and down into the holes.  I then used orange, green and purple cardstock as mats for the hat.  I cut a 3" letter "h" using my Slice machine.  I then stamped the "happy halloween" verse along the long side of the letter "h".  I used a striped contrasting piece of cardstock matted ontop of purple cardstock underneath both the hat mat and the letter "h".

Eat Drink and be Scary Halloween Card

I had fun with an old Stampin' Up! set from last year.  I used markers to color the pumpkin, verse, and spider and then punched out using my 1"square punch.  Placed on top of a 1 1/2" strip of black cardstock.  The pumpkin background cardstock was from an autumn stack I purchased at Joann's.  I stamped the verse in black ink, used both the small and large tag punches from Stampin'Up!; layered ontop of orange cardstock and hand cut the orange mat.  I attached the tag to the card front with a diamond brad.  The black twill tape runs along the left side of the card to give it some texture and balance.

Mummy Halloween Card

I used the Sizzix mummy die cut and the Tim Holtz brick embossing folder for the background of this card.  After embossing the bricks, I tore around the edges and distressed the bricks and edges with brown ink.  The bricks really pop off the background once distressed.  I also used black ink and distressed the tomb, mummy, and the words.

Witch Silhouette

I used the Tim Holtz witch silhouette die cut for the focal point of this card.  I originally used black cardstock for the witch, but it seemed to be missing something.  Then I used a piece of stiffened black felt for the witch die cut and it really seems to "pop" off the card now.  I distressed the edges of the moon with brown ink to tone it down a bit.  The background paper was found at Archivers.  The small icons are black suede, which gives it more texture.  I matted the printed background on black cardstock so it would be more of a focal point.  I then used some black Christmas trim from Hobby Lobby around the right top corner, stamped "happy halloween" from Stampin' Up! tiny verse set and punched out using Stampin' Up! tiny tag punch.  I also used dimensional dots under both the moon and the witch to give both more dimension. 

Wednesday, October 6, 2010

Vintage Halloween


I had fun designing the card!  I am loving the vintage look, and when I saw this Stampin' Up "Greeting Card Kids" stamp set, I knew I had to have it!  Lots of possibilities!!!  I used a Stampin' Up! texture embossing folder on the black background paper and used a Smooch spritz to glam it up a bit.  I ran the moon thru the Stampin' Up! large dot embossing folder for more texture and a short piece of purple cardstock was cut using a Martha Stewart spider web border punch.  I used watercolor pencils to color the little girl.  Used a few different card stocks and papers for the top mat.  The diamond-shaped strip is velveteen in texture.  Hope you like my creation!

Halloween Cards!


I've been busy designing some Halloween cards for my upcoming card classes.  I've used the new Stampin' Up! spider web embossing folder on quite of few of them -- love the look it makes for the backgrounds!  I used fishing line to make the spider web in the circle opening of the second card and put the embossed spider web paper inside the card for a different look.
The third card uses the Sizzix haunted house embossing folder on Black Core-dination cardstock.  I used yellow chalk around the moon for accent, and added a spider web border cut from a Martha Stewart border punch.  The witch and dracula are both from Stampin'Up!'s Fang-tastic stamp set.

Monday, August 30, 2010

First birthday! Card for Derek

My great nephew celebrated his first birthday yesterday.  I designed this card just for him.  The picture does not show the dotted embossed background on the blue card stock.  I embossed the cupcake with a Sizzix embossing folder and colored it in with Stampin Up chalks.  Gave it some sparkle by highlighting some of the cupcake and candle with my starlight pen.  Added a strip of red ribbon from Michael's at the bottom, attached the stamped "make a wish" verse, and was good to go!  The ribbon and the embossed background gave this card some nice texture.  Just enough sparkle for a boy without going overboard!

Musical themed birthday card for Steve

I designed this card for Steve, who is the band director at Grant Park School District.  I used the Stampin' Up!  lattice texture embossing folder for the cherry cobbler background card stock.  I ran a sheet of soft suede card stock thru the Big Shot using the Cuttlebug musical notes embossing folder.  I then used the soft suede ink and rubbed across both embossed papers with a sponge to give it that "vintage" look.  I sprayed the front of the musical embossed paper with the new log cabin smooch spritz to give it a little gleam.  Stamped the birthday verse and punched out using the new Stampin Up label punch.  Distressed the edge of the punch out.  Punched four holes in the label and ran some hemp around the musical embossed paper.  Attached to the cherry cobbler card stock with stampin dimensionals to give it a lift off the paper.  I was really happy with the finished result!

Saturday, August 28, 2010

Thank You Fabric Floral Card

This is a card I designed for my Stampin' Up! clients.  I used two different embossing folders (texture and floral) run thru the Big Shot machine.  I tore the floral paper on an angle and then used soft suede ink to distress the embossed papers.  I used hemp to tie a small "thanks so much" tiny greeting punched with a tiny tag.  I then used the Big Shot to cut various home decor fabrics with one of my flower dies.  Attached all the flower layers with a brad and used a glue dot to attach finished flower to card front.

Chalkboard Technique Birthday Card

I made this birthday card for my friend at work.  Fun chalkboard technique using white craft ink for the bird design.  After the image was stamped with the craft ink, I used various colors of chalk and a sponge applicator to "tap" the various colors on top of the stamped image.  Gave it a nice, soft look.  I used the Stampin Up square lattice texture embossing folder for the orange background, the top note die for the yellow matted section, and lots of other colors for layering. I stamped the verse on white card stock and punched out using the small oval punch.  I layered that on top of pink card stock punched with the scalloped oval punch.  A black scalloped border was punched and layered with turquoise ribbon/bow.  The lilac card stock on the bottom of the card gives it the added statement.  Hope you like it!

Saturday, July 31, 2010

Vintge birthday card for my dad!

My dad turns 87 years old tomorrow!  I designed this birthday card for him using the following Tim Holtz products:  rubber stamps, acrylic stamps, tape, and border die cut.  I added the "4 You" from Stampin' Up!'s stamp set and tag punch.  I was able to use the keyhole eyelet that I bought about three years ago!  Think it looks great in the corner with the tag hanging from it.  I used espresso metallic paint instead of ink for this card, distressing the edges of the paper and the tape as well.  I added just a bit of black/tan striped ribbon to the top edge of the car, using foam dots to give the car a lift off the paper.  I am really happy with the way it turned out!  Happy birthday, dad, and many more!!!
Preview

Wednesday, July 28, 2010

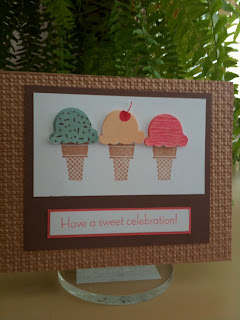
Ice Cream!!!

Here are five cards that I've designed for upcoming workshops during our lunch hour here at work -- I must say, one is cuter than the other!

Wednesday, June 23, 2010

Father's Day Cards

Here are the two Father's Day cards I designed for my card classes last week.  


The "King of the Grill" card is a watercolor technique.
It was difficult finding just the right papers for the ties on the Shirt cards -- the stripe is actually a Christmas holiday paper!  It worked perfectly though for this project! 

Tuesday, April 13, 2010

New Tim Holtz Birdcage Die Cut!!!

I was so excited to find Tim Holtz's new birdcage die cut at the local scrapbook store.  I saw it published on his website months ago and have been waiting patiently for the stores to get his newest goodies.  I bought some jump rings and crystals (from a bridal decoration -- took it apart, as the crystals were the perfect size for this project!  Gotta think outside the box, you know!)  I used chalk to color in the bird and wing die cuts so they would be more noticeable.  Core-dinations is the cardstock I used for the birdcage itself.  After it was die cut, I used sandpaper to tone down the shiny metal look and bring out the black center of the paper.  Love these papers -- so many possibities and colors, too!  I also distressed the birdcage with brown paint, to give it a more antique look.  I found the chain in the jewelry section of a craft store that had the rectangle-shape as the birdcage.  I think it is a perfect compliment to the card -- attached it using a jump ring.  I distressed some Prima flowers and put a crystal brad in the center for an added touch.  I found some scrapbook paper that looks like an old Sears catalog, so I used that for the background of the birdcage.  I still wasn't completely happy with it....so I found some vintage trim and attached it to the left side of the catalog paper....Now I was happy with it!  Just needed that little bit extra "something"!!!

Card to celebrate my mom!

Here is the card I designed for my mom, celebrating her honor of "Woman of the Year"... have to get it in the mail today!!!  I think she will love it!!!  I used black crystals as well as regular crystals to "glam" it up; added a bit of ribbon to the front as well -- I thought it needed that extra something. 

Saturday, April 10, 2010

Congratulations to my mom!!!

How exciting!  My mom has been chosen "Woman of the Year" from her parish, Mater Christi, in North Riverside, IL.  The archdiocese will honor all the "Women of the Year" at a special banquet on May 15th.  I am so proud of her!  She has been actively involved in their parish ever since it was founded almost 57 years ago.  Mom is incredible at 86 years of age -- Congratulations, Mom!  We all love you!!!

Monday, March 29, 2010

Easter Cards Evening Workshop

Last Thursday evening after work, I hosted an Easter Card workshop.  We met in one of the conference rooms in the building.  The ladies brought a variety of snacks to munch on while we made four different cards.  Eight ladies had signed up (one had to cancel at the last minute.)  The class ran from 5:30 p.m. til 8:30 p.m.  We had a great time, socializing and playing with paper and scissors!  Here are the cards we made that evening: